Sunday, December 22, 2013

Holiday Snow Globe Soaps!


If I can make a bazillion of one cute thing for all my favorite people in an afternoon, I win. Especially during the holiday season. You think you have time, then you don't. How does that even happen?  It takes all year for December to come around. We know this. Then a week before Christmas everyone is rushing around taking care of last minute details…. Guilty as charged. Well this year a friend and I decided to try something different. And it worked!

Nothing says Happy Holidays more than a thoughtful hand-crafted stocking stuffer.
Here's what you need;


  • 2 ice cube trays
  • White soap
  • Teeny tiny Christmas decorations (1/2 inch tall)
  • Soap scent
  • Soap dye (blue)
  • Soap glitter (optional)
  • Clear Glycerin
  • About 2 hours to complete this project
Steps:

1. First you want to grate your white soap. This will be used as the bottom of the snow globe. Think "Snowflakes". Make them thick curls and not powdery (trust me on this).


 2. Then you're going to melt your glycerin in the microwave. Stir it around every 20 seconds in a microwave safe dish. I used a Pyrex container for this. Add a couple drops of the dye after the soap is melted. You can get darker but you can't go lighter, so just stick with a drop or two. You want it to be light so you can see the little toy inside. (Optional, at this point you can also put in the glitter soap).


3. Carefully pour the melted glycerin into the ice cube trays. Only fill them up about halfway or a little less. Remember, you have to stick a figurine in there, and then you need to cap it with snow. Let it sit for about a minute. The glycerin will begin to form a skin on the top layer. This is your window of opportunity!


4. Using a toothpick, carefully position your figurine in the center (UPSIDE DOWN) in the ice cube tray. Like this...


 5. Then you're going to sprinkle a little bit of the white snow on the top of your ice cubes. Seal the snow up with the remaining amount of melted glycerin. You can also melt some new glycerin and leave the dye out so it's clear. This is what we did and it looked great. 

6. Put them in the freezer for about 15 minutes. When the cubes have cooled, crack them slowly just like an ice cube and out will pop your perfect little snow globe. 


 7. We decided to get tags printed and wrapped everything up in a very festive package. This is the end-product! Not only did everyone love this, but it was very easy to clean up in the kitchen.


 Happy Holidays!
This was a Danchelle Production. 


Saturday, November 16, 2013

Feeling Fall'ish

So I realize now, it's been about 4 months since I've updated my blog. (Gasp) Well I've been busy. Raising a child and stuff. But I wanted to get back on it so here I am. Now back to your regularly scheduled recordings…

Now that I have a baby, I get to do all these silly things I never EVER in a bazillion years would have ever considered doing. But now I'm doing even worse things than I ever could have imagined and I blame Pinterest. Browsing Pinterest can be deadly. It puts terrible ideas in your head about things you can do, and things that you really like but would probably never do, and things you shouldn't do but try anyway. It's exhausting.

So, I was looking through Pinterest one night when I wasn't sleeping (again) and found these pictures of babies with their butts painted like a pumpkin. It was cute.. so cute. The photos were perfectly staged and the little pumpkin butts were just .. well, you know. So that night in July, I decided to take another Pinterest adventure and do this with Stella. 

I don't know why I thought face paint would be ideal for the task. Obviously they don't sell butt paint (do they?). Anyway, I decided to wait until Halloween and goto the store like everyone else and purchase face paint. 

Well come to find out, face paint really sucks these days. I'm honestly not sure it was ever great. But nowadays it really sucks compared to whatever we used back in the day. I'm pretty sure whatever I bought was made in China out of some nuclear byproduct. You know when you buy something in the store and when you get it home it looks NOTHING like what you saw in the store? That's what happened to me. It "LOOKED" like pumpkin orange in the store, but when I got home it was like the color of volcano lava from a Nat Geo special. It was really scary looking.

Anyway, I put it on my baby. Let's talk about that…. So I got everything ready. The paint, towels, the pumpkin (props), and the camera close by. Stella was lying on the floor minding her own beeswax and here I come with fluorescent biohazard paint and schmear it all over her little behind. I even drew a little stalk on the top. cute.  

Clearly I hadn't done this before because the pumpkin really didn't capture the bottom portion of her bum quite how I envisioned (i.e; it wasn't Pinterest perfect). But going back to make the correction was a gamble. Seven month olds have the ability to spin around like the Tasmanian devil. Sometimes it takes two of us to get her in pants. (Don't even get me started about putting her in tights). Anyway, what I failed to think about was the white carpet directly underneath my spinning tornado butt. So this is where I accepted her butt for what it is, and this is what we got.


Not exactly the Pinterest Perfect look I was striving for but at least I can check this off the list and confirm yes - it's total pain in the ass … ha ha. I made a funny.  

Monday, June 24, 2013

Upcycled Drama!

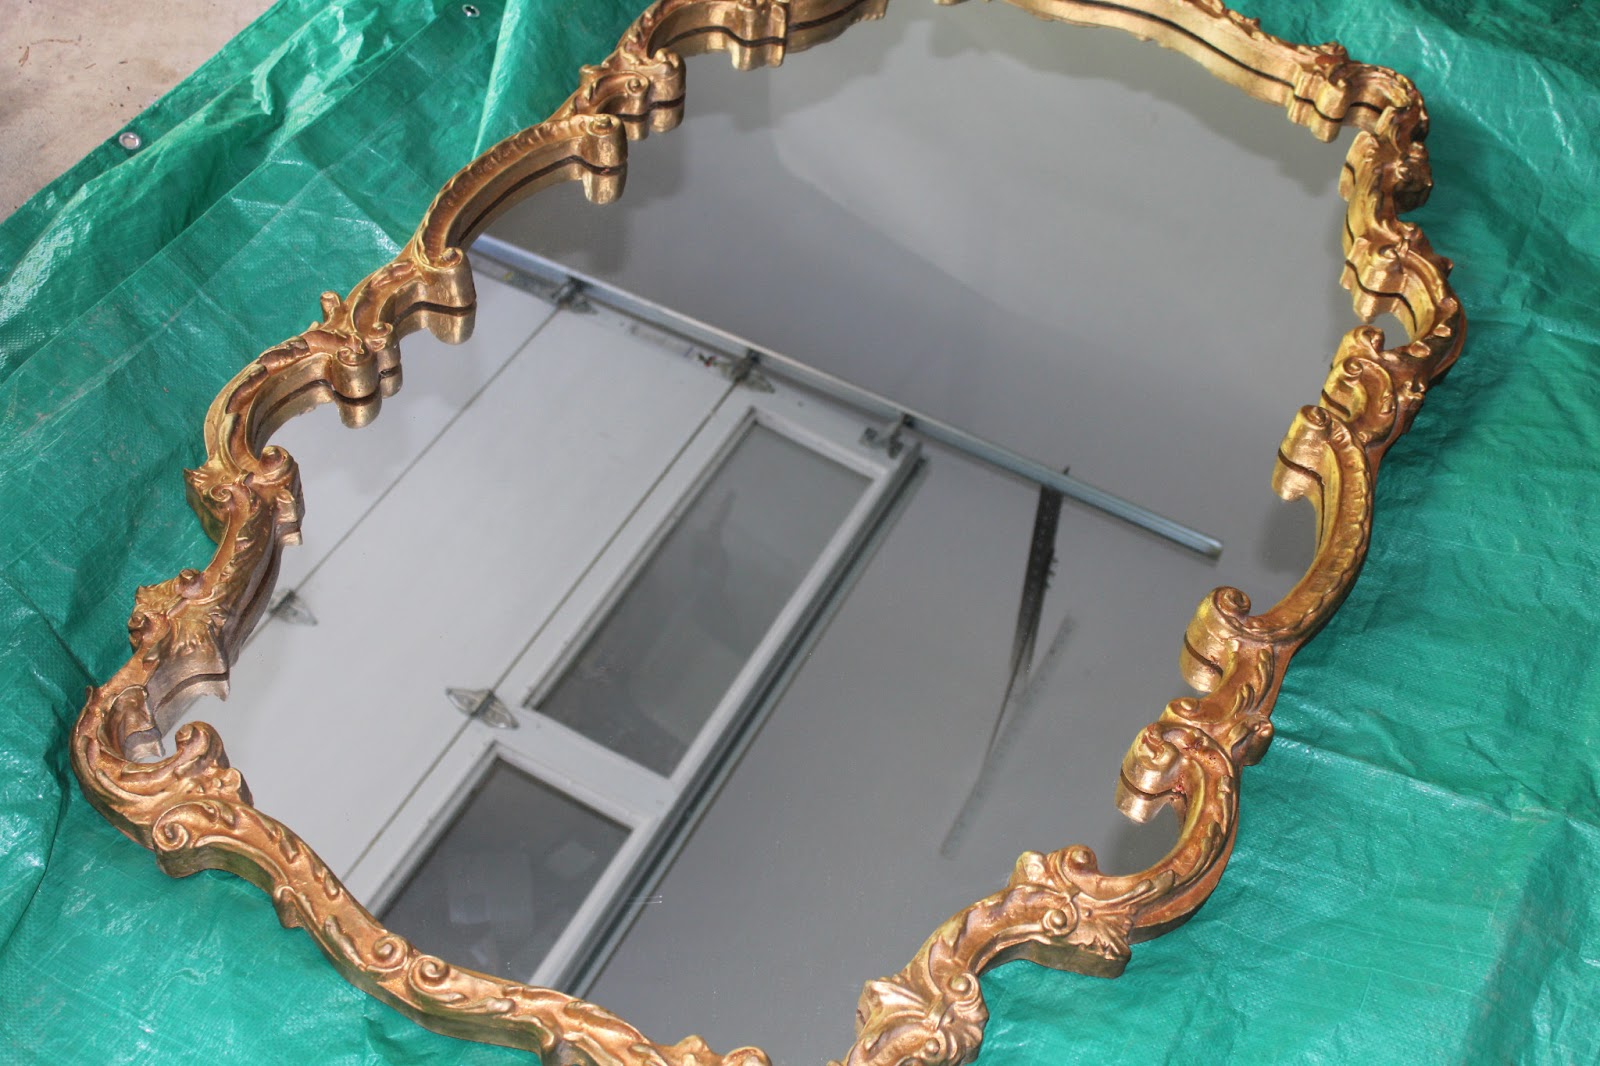
In the process of redecorating our master bedroom, I decided to replace a mirror that matched our dresser with something a little more swankier. The problem was, the mirror I was looking for was way too expensive ... So I decided to DIY it!

As usual, my first stop was Craigslist. You can search almost any word and find some interesting "things". In my case I just searched for mirrors - and found the PERFECT piece!
This mirror was about 60" long and weighs in at around 50lbs. But clearly that didn't stop me since Jeff did all the heavy lifting (thanks honey!).


Instead of using tape around the curves I was able to slip some paper around the frame to protect the mirror when I painted it. And this time, I used good old fashioned spray paint. 


The final result was pretty dramatic and definitely added some swank to the room! Now to find that perfect headboard... 


Sunday, February 10, 2013

A Quick Guide to Mural Envy

Painting a mural is a process but it doesn't have to be hard. I finally settled on the theme for our nursery and got started right away on the mural. Please note that finding a theme is a completely different story and I'll write about it next month. For now, let's focus on the title of the blog.

After you decide what you want to paint I strongly recommend investing in a projector. Projectors have been used for over a century by artists like Norman Rockwell and Maxfield Parrish (two of my personal heroes). Projectors help you get the image on the wall in the size you need. I've used a projector for many, many, a mural.

First, you need a high contrast image to work with. In this case I drew my plan on paper and passed along to another artist friend - Michelle Lana, to digitize the work and clean it up. She produced a .jpg which I projected on the wall. Thank you Michelle - you're the best. :)


After you project the plan in a very light pencil you'll want to set up the area in the room you plan to work in. You need plenty of lighting, floor covering, and supplies. I also recommend a trusty side-kick and/or apprentice to keep you company during the process.


Tips:
  • If you're custom mixing colors, mix more than you need. You'll never be able to create the exact color if you need more, and you will always need more.
  • Use synthetic brushes. Period. They're the softest and spread the paint the best. This reduces your work time and saves money because you won't have to repaint as many layers.
  • Try to avoid leaving brush strokes and thin out your paint. Paint strokes are hard to remove when you decide to repaint the room. Trust me...
When you're ready to paint work in color blocks. Work on one section at a time using the same color so you don't have to remix it again. I prefer to dilute my paints with a thinner or water to make the paint more pliable and smoother.  I usually have a hair dryer handy for quick drying between layers.


  Layer by layer you'll start adding the details. It takes time. Reminder: if you're painting with several colors you NEED to let it dry before going back in with another color. This is especially true if you're using tape on your edges.


Finishing detals are the most fun! Once you let the walls dry the best part is putting everything together!


The same rules apply for more complicated murals. But if you follow the guidelines above you should be on your way to mural envy. Good luck!


Sunday, January 13, 2013

Spaghetti Squash Mexicana with Tropical Avocado Salsa Fresca


While I am not a vegan, I do enjoy vegan meals when I have time to cook or when someone else is doing the work. (It's a commitment, you see.) One of my favorite cookbooks for vegan dishes is "Veganomigon". This is one recipe I've had great success with, which also doesn't take "too" much time out of your schedule to whip up. That is, once you cook the squash. Oh, and I recommend having someone else prepare the jalapenos unless you want to enjoy that sun-burned feeling inside your cuticles for the next 6-8 hours.

You'll need:
1 spaghetti squash around 3lbs


Salsa recipe:
1 cup chopped tomato

1 cup chopped pineapple, mango or papaya
1 avocado, cut into 1/2 inch chunks
1/4 cup chopped fresh cilantro
Juice from 1 lime

Bean mixture:
1 tablespoon vegetable oil
1 medium sized yellow onion, diced
2 jalepenos, seeded and chopped small (I suggest wearing gloves)
3 cloves of garlic, minced
2 teaspoons coriander seeds, crushed
1 1/2 teaspoons chile powder
1/2 teaspoon ground cumin
1/2 teaspoon ground cinnamon
1/2 teaspoon salt 
1/2 cup red cooking wine
1 cup fresh or frozon corn
1 can black beans, drained and rinsed

First bake the squash. Preheat oven to 375. Cut the squash in half across its waist and scoop out the seeds. Prick the squash halves with a fork a few times. Fill a baking dish with 1/2 inch of water and place the squash cut side down into the water. Bake for 45 minutes and set aside. 

While that's baking prepare the salsa!
Toss all the ingredients together and refrigerate. 

Then prepare the bean mixture:
In a skillet over medium heat saute the onions and jalapeno for about 5 minutes. Add the garlic and coriander seeds and saute for 2 more minutes. Add the rest of the spices, salt, wine, and raise the heat for a couple more minutes. Stir often. 

Lower the heat and add the corn, and beans and cook for 5 more minutes. Take the cooled squash and cut it in halves and shred and scoop it out into a bowl. Add the bean mixture and mix well. Divide this on plates and top with the salsa fresca. 

Enjoy!


Saturday, December 15, 2012

Chocolate and Almond Biscotti


Since so many of you asked, here's the recipe for my holiday biscotti. This was created from several other recipes and I still make little adjustments along the way. 

Before you set off on your biscotti baking journey - be warned - you will need a good portion of the day set aside, and another night if you plan to drizzle them with chocolate...which is totally worth it. But seriously, this is a commitment.... and don't try to rush anything.

INGREDIENTS:
1 1/2 cups of blanched whole almonds
2 cups all purpose flour
1/2 teaspoon baking soda
1/2 teaspoon baking powder
1/8 teaspoon salt
7/8 cup white sugar
1 1/2 cups semisweet chocolate chips for biscotti
2 cups of semisweet or dark chocolate for drizzle (optional)
1/4 cup unsalted butter - softened
2 eggs
1 teaspoon vanilla extract
2 tablespoons of whiskey... or more 

DIRECTIONS:
1. Preheat oven to 350 degrees. Toast the almonds in a shallow pan for 12-15 minutes, shaking the pan a few times until the almonds are lightly colored. Set aside to cool.

2. Preheat oven to 375 degrees. Line 2 baking sheets with aluminum foil, shiny side up. 

3. In a large bowl, stir together the flour, baking soda, baking powder, salt and sugar. Place 1/2 cup of these dry ingredients into a food processor. Add about half a cup of the toasted almonds and process for 30 seconds. 

4. Return the mixture to the bowl of dry ingredients and stir in the remaining almonds and chocolate chips. In a large measuring cup, beat the eggs, vanilla and whiskey with a fork to blend. Stir into the dry ingredients until moistened. Add the butter in slices. (You can also use a heavy duty mixer for this).  With your hands wet, divide the dough into 4 batches. Form each quarter into strips about 9 inches long, 2 inches wide and about 1/2 inch high. Round the ends of the dough and place two strips crosswise on each cookie sheet. 

5. Bake for 25 minutes in the preheated oven. If you're baking more than one at a time you need to rotate the sheets mid way through to ensure it cooks evenly. 

6. Using a metal spatula, remove the slabs from the cookie sheets and let them cool (warm to the touch) for about 20 minutes. Reduce the oven temperature to 275 degrees.

7. With a serrated knife, slide the slabs at an angle about 1/2 inch wide. Place the slices cut side down onto the cookie sheets. 

8. Bake 25 - 30 minutes in the preheated oven until the biscotti is lightly toasted. 

9. Turn off the oven and leave the door open until the biscotti has cooled, about 30 minutes. 

10. Store in an air tight container.

FOR THE CHOCOLATE DRIZZLE:
There are many ways to melt chocolate. The best way is using a double boiler. If you don't have one you can just use a small saucepan and a metal bowl that fits snug on top of the saucepan.

Fill the sauce pan with hot water from the tap. Make sure the water doesn't touch the bottom of the bowl you place on top of the sauce pan. Heat the sauce pan over LOW heat until it begins to simmer. Then put the metal bowl on top. Make sure the chocolate is chopped up into little pieces so it melts evenly. Stir gently until the chocolate is consistently smooth and shiny. If you need to thin the chocolate out, I've had success with Crisco Shortening. This helps a lot with thinning it out, depending on the type of chocolate you're using. 

Lay the biscotti out on wax paper and make sure they're evenly spaced out. If the biscotti's touching ends the chocolate won't drip down on the sides. 

Using a spoon, drizzle the warmed chocolate over the biscotti in a consistent pattern. Let the chocolate cool and dry before packaging the biscotti in an air tight container. 

Sunday, November 18, 2012

Flooring 101

When we moved here the entire first floor of our house was covered in a nice off-white carpet. It was glorious. It looked so peaceful and spacious... like a soft blanket of snow had just landed in my house and made all the clutter go away. It was absolutely magical.

That was until I learned the only way to keep it that way was to regularly vacuum foot traffic, steam clean cat puke, and remind our guests to remove shoes on a daily basis. Let's just say when we had guests over all I could think about was when that first glass of red wine that was going to christen the floor. (I would like to thank my friend DeeDee for taking care of that so promptly.)  

Admittedly, I was a bit neurotic. But you would be too if everytime you came home your eyes scanned the rooms for the next spot before you took off your jacket and settled in. I was obsessed with keeping the carpet impossibly spottless. I was turning into Mommy Dearest - scrubbing and steaming until the floors bared no trace of human inhabitation. If the vacuum lines weren't on the carpet it was time to vacuum again. Get the point? So here we are now.